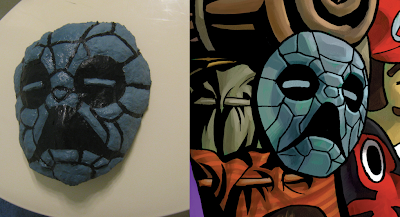
Masks are great additives to any costume. But in the Happy Mask Salesman's case, they're a necessity. With 10 masks on his pack, he's got a pretty distinct look, and with so many masks, having lightweight materials to work with is a wonderful plus. When making his costume, you can either purchase some mock masks to decorate his bag with, or you can make your own. It's a lot less hard than you think, I'm going to show you how.
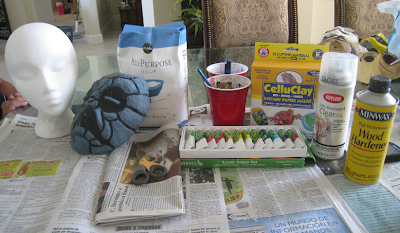
Materials:
- Wood Hardener
- Acrylic paints
- Sealant spray
- Foam head
- Celluclay
- Flour
- Elastic cord
- Water
- Salt
- Sharpie marker
- Scissors
- Newspaper
- Plastic wrap
- Large bucket
- Funnel
Total Cost Estimate: $50.00
(based on what I had to buy)
Currently selling for: $16.00 (5 or less) $13.00 (5 or more)
Project Duration Estimate: 4-5 days per mask
Many of these materials can be purchased at nearby arts and crafts stores, even Walmart. The foam head can be purchased at many beauty stores.
Overview:
This is a long process that requires several hours in between steps to allow the materials time to dry. It's also very messy. It produces lightweight, yet durable masks that do NOT have eyeholes. I will, however, mention how to make them in the tutorial. Since the materials come in large quantities, I would recommend making more than one mask. Here, we will work with 2 kinds of paper mache: home-made newspaper strips and paper mache based clay. Make sure to read carefully and examine the pictures to make sure you know which one to use at which time.
WARNINGS:
Chemicals used in this tutorial may be harmful when not used correctly. Wood hardener is a very dangerous and flammable chemical. The fumes it gives off are harmful if inhaled. Always work in highly ventilated areas and wear gloves and eye protection when dealing with it while it is wet! If you're under 16, get an adult's help before you continue. Remember to ALWAYS read the warning labels on products you are unfamiliar with.
Always make sure you read through the entire process before beginning to avoid mistakes and get a general idea of how the project will progress.
Now let's make get started:
Step 1: Making the paper mache
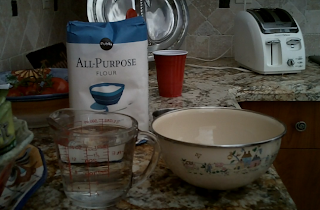
As mentioned earlier, we will be working with 2 types of paper mache. This first kind is the newspaper strip kind. For this, we will use a basic paper mache recipe. Based on how many masks you are making, you will use certain amounts of flour and water.
For 5 Masks, I used the following recipe:
- 2 cups of flour
- 2 cups of water
- tablespoon of salt
I'm not sure why you add the tablespoon of salt.. I think it may have to do with altering the mache's drying properties. Either way, I added it just incase.
(Another thing is sometimes people use elmers glue in place of flour. I find this mixture to be a bit more unpleasant. It's a bit heavier, a LOT stickier, and it's impossible for me to use without tearing the newspaper strands. Personally, I prefer flour.)
If you don't plan on making 5 masks, you can alter the recipe to whatever you want. Just make sure you have equal parts of water and flour.
Use your scissors to cut out several long strips of paper from the newspaper. I used a paper-cutter. It saved a lot of time and made the paper strips better.

Step 2: Coating the Foam Head
Your foam head is going to see a lot of action and it's not going to be pretty. A VERY necessary thing you will need to do is cover the face with clear plastic cling wrap. This way, the paper mache will not stick to the mannequin head and it can stay nice and clean. Take a long sheet of plastic wrap and wrap it tightly around the head. Make sure it's VERY secure. Try to unwrinkle the plastic so that you can get maximum coverage. Next, lay your head facing upwards so the paper mache can begin.
There are many ways to do this, but I find the cleanest way is to use a paintbrush to apply some four mixture straight onto the head and then laying down strips of newspaper over the "paste". This allows you to keep your hands clean.
Another way of doing it is to just get everything dirty. Dip your hands in the paste and keep them constantly wet. Then use them to smooth the newspaper onto the mask. You HAVE to keep your hands wet however. If they are only semi-wet, the mixture will start to dry and make tearing the newspaper more likely.
Once you have applied 2 or 3 layers of newspaper over the head, lay it out to dry. The drying process really depends on when you do it. I like to work during the day so I can lay things out to dry in the sun. Then again, I live in Florida so the sun is always harsh. For me, dry time only took a couple hours, for you it may be different.
Step 3: Soaking in wood hardener
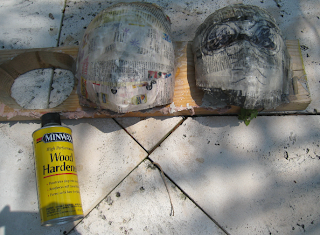
Once your paper mache mask is dried up, get ready to get it all nice and wet again lol. THIS IS THE MOST DANGEROUS STEP!!! Well, it's not so bad. But you do need to be careful and take necessary precautions. As mentioned in the warnings section, always work with chemicals with very strong smells and fumes in highly ventilated areas. Outside is ideal, especially since it can dry outside and you won't ruin any fancy furniture or carpet inside. This step is a bit tricky. Since we only want to soak the mask in the wood hardener, we will need the large bucket and funnel. Place your mask (or masks, this can be done with multiple ones) inside the large bucket. If multiple masks are being used, stack them on top of each other. Hold them inside the bucket. Pour the wood hardener over the masks and inside the crevices that are created from them being stacked together. Turn each one over and make sure the hardener has gotten every little section wet. Place them at the bottom of the bucket and pull each one out individually, gently shaking off any excess hardener into the bucket. Once this process is done with all the masks and there is nothing but hardener left in the bucket, place the funnel on top of the wood hardener's original bottle and pour the excess liquid from the bucket back inside the container. This way, you can reuse it again. Lay the masks out to dry yet again.

Step 4: A second coating of paper mache
Once the mask is nice and dry, use your scissors to clip off any extra dangling pieces of newspaper on the mask's edges. You'll notice that because of the wood hardener, the mask is now extremely tough and thick. This will help it hold it's shape and prevent from shattering when dropped. But most importantly, it will help us add MORE PAPER MACHE!!! That's right. Even more. But this step will give our mask a more realistic look. In this step we will add some more paper mache around the mask, and then we will curl the edges around the back of the mask. This gives the illusion that we have a thick mask rather than just a stack of paper. Usually after the wood hardener, the mask is strong enough to hold its shape through all the extra mache, but don't go overboard. No more than 2 extra coats is necessary. Once you're finished, lay the mask out to dry yet again.
Step 5: Drawing on your design
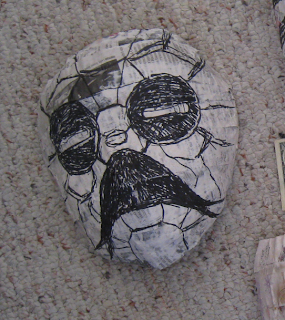
Now that your mask is dry for the 50th time, it's time to draw the basic design onto the surface. With a pencil, draw out your design lightly, making sure that both sides of the face are proportional. Once you get a pretty good idea, trace over it with the sharpie. This step is to outline where you will be elevating the clay in order to create 3D structures in the masks. Unless you choose to skip the final claying step, you will not be seeing this sketch again, so don't get crazy and make it BEAUTIFUL and perfect. You're only using it to help you position clay. If you're doing the Happy Mask Salesman masks as I am, finding a good reference picture for his masks is very difficult. You may need to play the game and try to look at him for some masks. Overall, I was able to find a few decent pictures on deviantart and zeldawiki.
Optional Step: Adding the eyeholes
If you want to add eyeholes in your mask, now may be the best time. I didn't add any on my masks since they were being attached to a backpack and I wanted to make them as close to the game as I could. Sometimes eyeholes can be disguised into the mask if done clever enough. Since our mask is still mostly made of paper mache, we can still poke a decent hole and since you've just finished drawing your design on the mask, you have an idea of where the eyes should be. Depending on the mask's shape, you may or may not be able to poke the eyeholes into the anatomically correct areas. What this means, is sometimes the mask's nose or eyelids may be where your eyes will be. To find out where you should poke the holes, try your mask on. Chances are, the foam head's shape should have created a distinct imprint of where your nose and forehead should go in the mask. Since our mask still has newspaper everywhere, use it to your advantage. When putting the mask on, look directly in front of you and memorize the section of newspaper your eyes come close to contact with. Then, mark the area with a small dot with a sharpie. If you have one available, use a power drill with the smallest needle setting to drill holes into the mask where you have placed your dots. If you don't have a power drill, you could use an exacto knife or a nail and hammer, but just avoid scissors. You only want a very small hole so it's not too noticeable.
Step 6: Adding the Celluclay
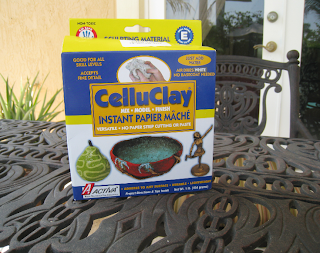
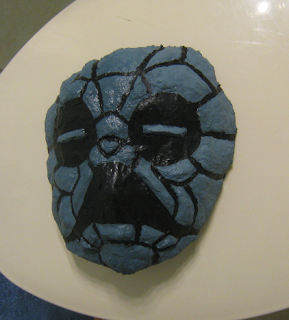
Now finally, for the clay. Celluclay is a paper mache based clay so it has little pieces of paper mixed into the contents. In the box, it brings a pamphlet that says what ratio of water to add to the clay, but it was annoying to try and figure out so I just kept adding water until it was workable. Since the clay will dry in small quantities, it will usually need more water to be worked with either way, so adding more water isn't a big deal. Using the sketch as before, you're going to add clay to the mask. For my masks, I either added extra clay to the eyes or added none, to clearly mark them. Other features such as noses, lips, eyebrows, pupils, beaks, outlines, or anything that helps you determine where to paint should be elevated in some way. Another thing you will use the clay for is to give the mask texture. You should cover the entire mask with clay to hide any imperfections in the newspaper. Just remember not to cover the eyeholes if you made them! You can cover the relative area with clay and then poke a toothpick through the hole to clear any clay that may have gotten in there. When your entire mask is covered, dip your hands in some water and smooth the celluclay out. It is pretty lumpy, so it may be a bit difficult, but the lumpiness isn't hindering in any way. Once painted, it looks fine. You may sand it down if it bothers you, it's just a bit time consuming. Once you're pleased with the features, lay it out to dry. THIS time though, it will take the longest. The clay usually takes about 4-5 hours to dry out, so I would leave it overnight just to be sure.
Step 7: Painting the mask
Now that your mask is basically at it's final stage, all that's left to do is paint it and seal it. Depending on the types of masks that you're making, you may be better off buying a kit of paint that comes with small amounts of different colored paints rather than a large tube for each individual size. Again, I like acrylic paints, so that's what I used. I would NOT recommend spray paint or watercolors. Watercolors are too light and won't cover well enough, and well.. Unless you have some sort of stencil, spraypaint will be useless. Paint your designs carefully on the mask, following the outlines you gave yourself in the clay, or simply by referring to your reference pictures. Don't fret if you mess up: just let it dry and paint right over it :')
Step 8: Sealing your mask
And with your mask painted it's time to seal it! Using your paint sealant, give the mask a quick coating. Make sure you do it outside, the stuff smells pretty strong and it can make your floors slippery and shiny. This step is not completely necessary, but I would recommend the heck out of it. This coat prevents any major chipping of the paint, including when you drop it or if it gets rained on. It also helps clean the masks easier if mud or soot gets onto them.
Step 9: Stringing your mask
And a quickie final step. Stringing the masks is very simple. Take your stretchy cord and cut a piece that fits just across the inside of the mask. Use hot glue to glue one side on at a time to the inside of the mask. I don't/didn't want to poke holes into my mask for the strings, so I just glued them on, but it's your preference.
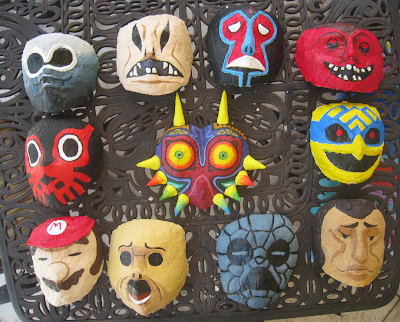
AND there you go~
A nice home-made lightweight mask that can withstand a beating (literally, I punched one in the face and it looked the same afterward lol)
For more information on this costume click here!
For more information on purchasing jewelery and other props in my tutorials, requesting a custom item, or an idea for a new tutorial, feel free to email me at Kanti-Kane@hotmail.com (:

omg! I love the masks! very nice work! :D
ReplyDeleteI'm sure that someone has already bothered you about this, but the mask at the top left is actually more blue than grey. Mind, it does look grey inside of the clock tower, and it is represented as being silver in OoT 3DS's mask shop, but in both versions of Majora's Mask it is a pretty vivid shade of blue. Well, I guess I'm done nitpicking over a project that you did years ago. At any rate, I think that your crafts are pretty awesome. I might have to watch some of the videos on your Youtube channel.
ReplyDelete