..

...

Saturday, January 4, 2014

Payday 2: The Heist Masks


Hello everyone, today I'm going to be showing off of my new Payday 2 masks! I had made these a couple months ago and managed to do an amateur photo shoot and take some behind the scenes pictures of the actual manufacturing process. I won't go into much detail about how to make them mainly because I didn't fully document the entire process and the mechanics are essentially the same as my Majora's Mask one-part mold tutorial, so if you're interested in that, you can find it here.

If you're interested in owning your own, you can find them for sale on my etsy store.

So without further adieu, let's get into the photos:

These are from the photoshoot with only the Wolf and Hoxton masks. Sorry for the terrible lighting :/


Now for a closer look at the masks themselves:

Here are some photos of the completed masks and how they look when finished and tinted.


The masks themselves are made from several layers of very durable cast resin and hand-painted with resin paints.


These following shots are of the sculpts made for the masks themselves. These were done using an armature and then sculpting over it with MonsterMakers clay.


Sunday, February 17, 2013

Updates

Hey guys I know it's been a while but I have a couple new things I'm going to be introducing and hopefully they'll be cool things everyone will find useful and stuff.

Anyway, the first thing I'd like to announce is that I will be holding a couple Kickstarter events in the near future. I will be doing some major re-hauls on my previous stuff in order to make them more durable, lightweight, etc. Anyway, I'll be announcing the Kickstarters via my Youtube and Facebook as well as on here so if you're interested just keep an eye out.

Another thing I've been working on is my Youtube page itself. I will be making at least ONE video a week from now on, hopefully more but for now let's just say one. Last week I sh*t out a bunch of videos about mermaid tail how-tos and information so if you're interested in that stuff go ahead and check out my channel and look for the mermaid playlist.
Remember the external website links are right over there for your convenience  ---->

And finally, I have created a Livestream account for myself and I plan on streaming a LOT of stuff. Mostly just me while I'm working on stuff, so if you're interested in knowing how I do stuff you can give it a look. I'll also be available to answer questions directly so it's a nice touch.
Right now I don't have a schedule for my Livestream but I'll be posting it on the page's description once I decide to work it out. I also don't have any events planned but I imagine if I do it'll be something huge like a project and I'll schedule the dates accordingly.

I'm not ever sure if people actually read these things, so I'll be publishing everything to my facebook as well. I just like my blog better so you guys who actually stick around and read the stuff I post on here get the heads up before everyone else.
Good for you! Facebook is mainstream anyways.

Monday, June 11, 2012

Hooved Shoes - Finally for sale!


Bout time!
Basically all I can say for now, they're finally for sale!
If you're interested, check out my etsy
 If you'd like to see a video of these hooves, check my youtube

Anyway some details on these new hooves:

- They're made from a very durable epoxy that is not only wear-proof, waterproof, and shatterproof, but it makes that great clacking noise my first ones made
- These new hooves are much more lightweight and easier to walk in
- They're sculpted better to support your foot and prevent rolling backwards and falling in them
- They're molded, so every hoof you get will look exactly as the ones pictured
-  I will be releasing several styles and new hoof designs fairly soon
- You can submit a pair of heels that I can use in the shoes to discount your price and to ensure that they will fit you just as you'd like them to
- I will soon have several material options available
- Custom painting is free of charge
-  Each hoof is sculpted DIRECTLY onto the heel for the best available attachment and a permanent bond rather than gluing them on afterwards

Old pair vs New pair

Just a quick overview of what's improved in terms of old vs new.

Old Hooves
Pros:
- Realistic look, very slender
- Arc support
- Large hoof - asthetic purposes
- Clacking noise that immitates real hooves
- Waterproof
- Shatterproof
- Durable

Cons:
- Very heavy hooves, walking is strained after a few hours
- Must be very cautious with use due to weight
- Cannot walk offroad very well, paved areas needed
- Bottoms of shoes wear and crack after extended use
- Cannot run in shoes
- Large hoof, makes balance a bit more difficult, inhibits movement
- *Rollback problems

New Hooves
Pros:
- Realistic look, very slender
- Arc support
- Smaller hoof, easier balance
- Lots of *rollback prevention
- Very lightweight
- Extremely durable
- Shatterproof
- Waterproof
- Highly wear resistant
- Clacking noise immitates real hooves
- Hooves molded directly onto shoe for a more stable bond

Cons:
- Must use caution when in tiled areas, minimal friction
- Must use caution when walking on uneven surfaces


*Rollback - since there is nothing supporting the back of the shoe since there are no heels, shoes with their heels removed will always have a problem with rolling backwards, basically due to the fact that there is a lot of area of your feet that is being suspended in the air over the back.
This is why many people install wood sticks or metal poles to protrude behind the shoes to make walking easier and prevent the rollback.

Friday, June 1, 2012

FAQ About Realistic Full-Silicone Mermaid Tails - Pre-Tutorial


http://a2.ec-images.myspacecdn.com/images02/130/bd7b0c82a18d43ff90450956b3640951/l.jpg
Photo (c) Mike Van Daal


Hey guys, I'm planning on releasing a Full-Silicone Mermaid tutorial fairly soon, but I just wanted to answer some questions about materials and silicone that people seem to have and don't get answered very often. I know it's not a tutorial, but it's some very useful information that may come in handy to those of you who are trying to make a mermaid tail but don't know where to start.


FAQ Materials:


What type of silicone to use?

-There are lots on the market but I think Smooth-on's DragonSkin is probably the best to go with simply because I've seen the most information about it and Smooth-on has many distributors around as well as staff members who are great at answering questions. Whichever you decide to choose, you MUST USE PLATINUM CURE SILICONE!


What is platinum cure silicone and why do I care?

- Platinum cure silicone is silicone that is SKIN SAFE. It's vital that you make sure you get ahold of platinum cure silicone or else you may develop skin complications from over-exposure to an unsafe material. The other option, tin-cure silicone is unsafe for prolonged skin contact.

Dragonskin has lots of numbers and types? Which to use?

-Dragonskin comes in many grades with many numbers. The numbers: for example: Dragonskin10, Dragonskin20, etc. All tell you how hard the silicone is.
^This is a scale used to read the hardness, Dragonskin is in shoreA.
Dragonskin10 doesn't seem hard enough, but it is. You have to remember the Dragonskin will be against your skin and you'll be stretching it a lot. The harder the Dragonskin gets, the less stretchy it becomes, so Dragonskin10 is probably the best choice.
^This is a chart that compares all the qualitites of Dragonskin silicones
Dragonskin10 is a great choice because it comes in 3 working times: Slow, Medium, and Fast. This allows you to choose howmuch working time you will have with the silicone before it cures. Medium is generally the best, since it allows you ample time to work with it, even if you're a beginner.
Dragonskin10 also gets the best of both worlds. It's soft, which is great, but it is also very durable. Dragonskin10 has the best properties in terms of stretch, durability, and softness, so it is highly recommended.
***Dragonskin FX Pro is another type of Dragonskin that can be used for mermaid tails. However, it is a bit more difficult to use since it has a much shorter working time. I managed to speak to a Smooth-on tech about FX Pro and he said that FXPro has amazing flexibility so it follows the skin a lot better, but it is less durable than Dragonskin 10. So really, depending on what you plan on using your tail for will highly contribute to which type may be best for you.
A special thanks shout out to Merman Jesse who told me to also consider FXPro

That chart you posted is a little weird. What does everything mean?

Name:  Dragonskin Stats.png
Views: 15
Size:  29.0 KB
Well let's take a look at it again
-I may seem like a total Smooth-on nerd but that's because I love the fact that they post these charts for every product they have. It really helps you compare product A to product B in what you're trying to use it for. Anyway:
A:B Mix Ratio is the ratio you need to mix parts A and B. Everything Smooth-on sells usually comes with 2 parts that have to be mixed together in order to begin the curing process. So a 1:1 or 1-to-1 ratio basically tells you that parts A and B are mixed evenly. Something like 1:2 would mean partA requires only 1 while partB requires 2. So for example, if I measure out 30cups for partA I would need 60cups for partB to achieve the proper ratio. Simple math, really. You don't have to worry about that since Dragonskin is always 1:1. BY VOLUME means that you measure it out by volume rather
than weight. So you'd use measurements like cups, tablespoons, etc. rather than ounces, pounds, or grams.
Demold Time is the time the mixture takes to FULL CURE. This means that after both parts are mixed and distrubuted into your mold, the demold time is the time it will take before you can remove the product from the mold. You can think of it as a "fully cure" time.
Elongation at Break is the amount of stretch the material can withstand before breaking apart. Usually, the harder a material is, the less it can stretch. So in this example, Dragonskin 10 can stretch to 1000%(10 times) it's original length before breaking.
Mixed Viscosity is essentially how thick the product becomes once parts A and B are combined. I don't really know how to read this off the chart, but the higher the number is, the thicker your mixture is. I THINK numbers below 4000cps must be poured into molds. Just a guess
Pot Life is the amount of working time you have with a product once both parts are combined together. This time is very important because it demonstrates the amount of time you will have to work. Usually for Dragonskin (which needs molds to work, anyway) it's not such a big deal, but giving yourself a long working time is always good just incase something goes wrong. Pot life can be translated into the amount of time you have to work with your material before it becomes too cured to maneuver anymore.
A special thanks shoutout to Mermaid Lorelei who suggested that freezing the mixed silicone is a way to extend the pot life. So just incase you mix more than you're going to use, you can potentially use it later by tossing it in the freezer.
Shore Hardness is the hardness of the material once cured. This is sometimes hard to grasp since the measurements on the scale are things like gummy bears and shopping cart wheels. For a mermaid tail, you generally won't need anything over 10. Silicone rubber is usually measured in shoreA. 
Tear Strength is the amount of abuse a material can take before beginning to tear. The lower the number, the less abuse. It's a bit confusing when you compare it to elongation at break, but think of it this way: the amount of stretch you can get out of your jeans before they tear is different than the amount of wear they can take before a hole tears in them.
Weight is a weird measure, I don't really understand it, but I'll take a guess. The measure is in CU.IN/LB = cubic inches per pound, so my guess is that the measure given is the WEIGHT the material can support. So for Dragonskin10, it's 25.8 lbs per square inch. I have no idea.. Lol

How much to use?

- Generally you'd want to use at least 2 gallons of Dragonskin. TECHNICALLY SPEAKING when you buy the 1 gallon measure of Dragonskinyou're actually getting 2 gallons (1 gallon each, part A and B) so by 2 gallons I really mean 2 "gallon orders" in according to Smooth-on, which is actually 4 gallons. Your fluke is going to eat up a lot of silicone, so you have to consider that. Probably a good idea is to save an entire gallon for your fluke so you don't end up having a half-finished fluke after casting your scales.

How do I paint silicone?

- Smooth-on sells a silicone paint base called Psycho Paint which is an absolute ripoff in my opinion, but if you have a lot of money and are very meticulous about making everything perfect you should consider it. Painting silicone is literally impossible with regular paint since not much can stick to cured silicone, so your best option is to mix pigment or paint into part B dragonskin, then mix parts A and B together, water it down a bit to reduce the viscosity, then run it through an airbrush or paint it directly on with a paintbrush. Powdered pigments are generally better to mix into silicone. You can mix acrylic paint, glass paint, floral paint, etc. but the thicker the paint, the more likely it is to interfere with the silicone properties.


How do I work with silicone?

-Dragonskin silicone is very runny, so you can't exactly sculpt or maneuver it very well. Molds will need to be made in order to shape it. When it comes to making a mold for Dragonskin, you can use ANYTHING, even Dragonskin.

How much does Dragonskin cost?

- All Dragonskin silicone costs the same: $183.72 per "gallon" (actually 2 gallons).

What are the advantages to making my own tail?

-Making your own tail may seem daunting at first, but a lot of the work is mainly mold making, so errors can be spotted far ahead of time before you even touch any Dragonskin. Making your own tail not only saves you money, but it allows you to be artistic, to design and make a tail that is fit just for you. It is a LOT of work, I don't want it to sound like it's easy, because it is very hard and time consuming. However, the reward of being able to tell someone you make a tail yourself is great, not
to mention you cut out potential risks of tailmakers messing up your measurements, etc.

How much would I save by making a tail myself vs purchasing one from someone?

- The main concern with pricing a silicone tail is the fact that there is a lot of time put into making it. So if you have absolutely no free time, you may have no choice in purchasing a tail, however, if you start early and tackle the process one day at a time, you can work to your ability. Charging yourself for your time is essential and is also what others base their price off of, so it's very important to consider.
Here is a cost estimate of the tail-making process when using the following materials:
$367.44 - 2 gallon units of DragonSkin (actual tail material)
$138.18 - 20 lbs Alja-Safe Alginate (leg mold)
$35.00 - Fiberglass resin (casting legs)
$64.41 - gallon unit of ShellShock (plastic mold making material)
$46.31 - pint unit of Psycho Paint (silicone paint base)
$47.50 - 2 units of 5lb Monster Clay (sculpting)
$10.79 - paper cutter punch (shaping scales)
$30.00 - estimate cost (wood used in mold box)
$100.00 - random decoration/tool budget
$100.00 - shipping estimate                                                                         
$939.63 = PROJECT TOTAL

As you can see, even with all the extra costs added in that may not even apply or be needed, the cost to make this tail is still less than $1,000 whereas many tailmakers charge $2,000 or more. Not to mention, these materials are used for the very first time when making a tail. Once you have your leg mold, scale mold, and fluke mold finished, you will never need to purchase those materials again and it will cost you only the price of the Dragonskin and decoration costs to make another tail, dropping
the price down to around only $500.

Where can I get Dragonskin?

- You can obtain Dragonskin straight through Smooth-on, but generally it's a good idea to find out if there's a distributor near your area so maybe you can drop by and get some in person to avoid those annoying shipping fees. Smooth-on has a list of their distributors on their website: http://www.smooth-on.com/ and they generally don't charge any more or less than Smooth-on themselves so it's usually better to find a distributor closer to you for shorter shipping time and cheaper shipping in general.

What's a good mold material?

- Mermaid tails are comprised of many different parts. Making molds for them is difficult because you sometimes need several different materials. Regular molds usually include a silicone layer to capture detail with a hard "shell" backing to support the silicone and keep it from flopping around. When making a large scale sheet, you probably aren't going to want to make a shell backing that large, since it'll be difficult to move around and match up to your silicone layer. Liquid plastic is great because it can be poured over your scales and capture detail while also drying stiff and rigid so it cancels the need for a backing. Special thanks shoutout to Mermaid Lorelei and Dr.Seaweed who used liquid plastic for scale molds

What do I make scales and flukes out of?

- When making molds, it's generally a good idea to use oil-based clay as your original sculpture since it's sulfur-free. I don't really know what the big deal with sulfur is but I think it interferes with the curing of certain silicones so it's best to avoid it altogether. Super sculpey is sulfur free. Monster Makers clay is a great clay to use because it's very rigid so sculpting complex pieces will be supported well and it hardens very fast so making the mold will not damage your final piece.
Craft foam seems to be very popular when it comes to making scales since it's very cheap to purchase and easy to shape. Simple circular cuts of craft foam can be arranged into a scale sheet to save time. Pumpkin seeds have also been used before but they're a bit difficult to arrance since they require a layer of clay to stay fit into place.
Special thanks to Mermaid Star and Dr.Seaweed for scale shapes and materials

Friday, April 27, 2012

How to make one-part Molds


Are you looking to replicate something simple? Is it because you want to make it out of a different material or maybe just because you plan on making more than one? For whatever reason you may need, sometimes molds are just the easier route to go! Depending on the complexity of your object, you may be able to make a one-part mold.


Materials
- Silicone or Latex
- Clay (sulfur free recommended)
- Multiple disposeable paintbrushes
- Disposable cups or plastic measuring cups
- Fiberglass resin
- Fiberglass cloth OR
- Plaster bandages
- WD 40 or Mold Release
- Petroleum Jelly
- Scale that can read grams
- Air duster
- Scissors
- GLOVES!

 Total Cost Estimate: $140
(based off what I had to buy)
Currently Selling For:

Project Duration Estimate: 2-3 days


Many of these materials can be purchased at nearby arts and crafts stores, even Walmart. The actual molding pieces such as the silicones and latexes will probably need to be purchased online.

Overview:

A lengthy tutorial that will teach you how to make a one-part silicone mold. These molds are often used for simple pieces that have at least one significant FLAT surface that you can use to press against a table with small or insignificant undercuts.

WARNINGS:RESIN of ANY type is extremely dangerous when handled without following proper guidelines. Resin is not only unsafe to touch, but it has a very strong smell and it's vapors will cause very serious damage if inhaled. You MUST work in a well ventilated area AND wear a breathing respirator to filter the harmful airborne chemicals it releases. ALWAYS wear gloves when handling it. If it gets onto your clothing you MUST remove and dispose of the contaminated clothing piece. Do not attempt to use resin if you are under 18 years old. Please ask a parent for help.
LIQUID LATEX may or may not be a harmful substance because latex varies from person to person. Some people are allergic to it and cannot touch, handle, or even smell it, while others can come into contact with it and they will not develop rashes. You should always wear gloves when handling wet liquid latex, wear a respirator, and work in a well ventilated area. Since allergies can arise spontaneously, it's important that you take the extra step to prevent any unneccessary contact.

SILICONE can often be dangerous if handled without gloves. Many mold silicones are unsafe for prolonged skin contact and should not be handled for long periods of time or be allowed to dry on the skin. Some types of silicone also often release very strong smells. While some of the fumes are not dangerous, they are very unpleasant. Please wear gloves and work in a well ventilated area.
AIR DUSTER is a very dangerous cocktail of chemicals and is NOT to ever be ingested or inhaled. When using a can of air duster, aim away from your or anyone else's face. It also often releases freezing air which is very painful.
ALWAYS read the warning labels on products you are unfamiliar with.


Always make sure you read through the entire process before beginning to avoid mistakes and get a general idea of how the project will progress.
Now let's make get started:


Step 1: Preparing your Subject
The very first step in this tutorial is going to be finding and preparing the piece you're going to be molding. If you're piece is already made and ready to go, then skip this paragraph. If not, then I can only assume you're sculpting or making the piece yourself. Generally, when making an object you want to mold, it's popular and useful to make it out of air-dry modeling clay (water based). You can go with oil based, but water based is just easier to clean. Anyway, when you sculpt your piece, make sure one of the surfaces is completely flat and will not be difficult to remove the silicone from. I used a couple sheets of wax paper to keep the silicone from making contact with my table. Generally, you can use a piece of wood or a plastic table, just make sure you don't care much for it. To make the piece flat, simply work on a table and press the bottom surface flat against it. If you're doing an intricate pattern such as I did, you're probably going to want to make the indents very deep so that the silicone that gets into any of the crevices is strong and thick enough that it won't break off. Once it's done, let it dry off completely. If you need to take breaks from working, simply put a bit of water over the top of the piece and wrap some foil over the top so it won't dry out.
Now that your piece is done (or you already had one) you need to make sure the bottom piece that is flat against the table doesn't allow air underneath. If you sculpted it against the table as mentioned, then it shouldn't be too big of a deal and you can probably skip this step.
However, you will need to spray MOLD RELEASE onto your piece regardless of what it's made of! Home Depot usually sells a universal mold release. If not, Michaels, AC Moore, and other craft stores often sell mold releases, but they're often way overpriced.

Step 2: Coating in Silicone
Now that you have the piece ready to go, we're going to coat it in silicone. For this tutorial, I used Mold Max 30 (it can be found here) as well as Thi-Vex, a thickening agent (found here). You can use other things, I simply used Mold Max because it was recommended to me. Even if you don't use Mold Max, most molding silicones are very similar, so you should be able to still follow the tutorial. Anyway, the first thing you want to do is measure out your contents accurately. For most silicones, you have a part A and a part B that you need to mix together to a certain ratio. Mold Max is a 10:1 ratio respectively A to B. This means 10 parts A for every 1 part B. For a more detailed explanation, view the video here. Anyhow, once you've got the silicone mixed, you're going to need to put on a thin first layer of silicone. Simply pour your silicone onto the center of your piece and use a disposable paintbrush to lightly work the silicone evenly all over your piece. This layer is very important because it will capture all the detail of your piece. Don't use TOO much silicone, it'll just run off the piece and onto the surface of your table, just use a light layer. Once your entire subject is coated with a decent layer of silicone, take out your air duster. You'll need to lightly spray the surface of your piece to reveal and get rid of any trapped air bubbles that may have formed. You DEFINITELY don't want bubbles in the piece or you''ll get unwanted bumps and lumps in your final cast. The bubbles are a bit difficult to spot, but don't be scared of the weird shapes that form when you spray the air at the silicone. Here is a nice video showing the process.
Once the first layer of silicone is on, allow it to semi-dry for an hour or so before you add your second layer. Adding the second layer is the same as the first, you SHOULD use the air duster to reveal and get rid of any air  bubbles. Depending on how runny your silicone is, you may or may not have to do this the other later layers. If your silicone is very runny, almost watery, you may want to do it again. If an air bubble gets trapped right under the surface of the mold, there is a chance it may tear open when you de-mold anything from it and you certainly don't want that. Anyway, once you've added about 3-4 thin layers, it's time to take out your Thi-Vex or other thickening agent and add it into your next batch of silicone. The thickening agent is great because it will add strength and multiple layers to your mold. It's a quick way of bulking it up and you want it to be relatively thick or it will be more prone to tearing. Not only this, but thickeners are often vital depending on your piece. If your subject has lots of undercuts, you need to fill them with silicone and slope them so that your shell won't snag onto them and tear them off when demolding. If you're confused as to what I just said, just make sure you're finished silicone piece looks somewhat like a dome. You want all the edges to be smooth and you want the bottom to be wider than the top. In the next step, we will make a shell and if the shell can get under anything in your piece, it's no good. Use the silicone thickener to get a cake icing thickness of silicone that will stay put so you can fill any spaces with it. Silicone thickener generally doesn't have a ratio to be mixed, you simply add more the thicker you want the silicone. For my mold, I put 3 thin layers and 2 thick layers.
Once you're done, let the mold rest and cure overnight (roughly 16 hours).

*OPTIONAL*
Using Silicone Caulk
If you're going to be using silicone caulk, things will be a bit different. It's supposedly bad for you when it comes to frequent skin contact. What this tutorial calls for requires handling the caulk directly and I've been told that it's not harmful so long as there is no prolonged contact. If you don't want to handle the silicone, simply wear some gloves or use a tool rather than your hands. If you do handle the silicone, make sure you wash your hands thoroughly after use for about 5 minutes to completely dissolve any remaining silicone. Besides that, work in a well ventilated area, this stuff reeks.
Anyhow, the very first layer should be thin and carefully done since it's the one that will be capturing all the detail. Once you've got it done, you can add more on top. To apply the silicone caulk, you're going to need a caulk gun and a cup of soapy water. Caulk guns can be bought in the same area as caulk tubes, so just grab one when you get your tubes. To make your soapy water, put a super load of soap into a cup and jet in some warm sink water. The soapy water is used to keep the silicone from sticking to your hands and it works quite well. Add a nice glob of caulk on one side of your piece and use your fingers to press it across the entire length of the piece. If you need to add more caulk, add it over the caulk you already have set. This prevents air bubbles from getting trapped. Push the caulk into all the crevices, adding any more that you may need to fill them. Caulk dries rather quick, only about an hour or so, but you don't really need to wait for it to dry inbetween layers. Once you've got one layer of caulk across your piece, let it sit until it gets a little gummy, then just add some more on top. You shouldn't let the caulk dry completely, as silicone sometimes won't stick to itself once cured.

*OPTIONAL*
Using Latex
If you're using latex, you generally will do the same as the above materials, however, you will probably be working in much thinner layers. Mold making latex is essentially liquid latex. Whereas most silicones are runny but have a more paste-like consistency, latex is VERY runny. Do the same as you would with regular silicone, adding a small layer first to capture detail, then work yourself up with multiple layers. The advantage to latex is that it dries VERY quickly, so time inbetween layers shouldn't be that bad. Since latex is so runny, your first layer will probably be VERY thin. Simply add 3 or 4 layers in this thin latex just to ensure you can SEE that there are no bubbles. Once you've done the first few, you can use latex thickener to thicken the latex and pour it on top, saving time.


Step 3: Making the Shell
Now to make the support shell that will go around your mold. This is important to have because it keeps the silicone from flopping around or sagging when you're making a cast. You don't want a warped piece do you? Anyway, you can make the shell multiple ways. Most people will go with plaster bandages because it's cheap and simple, but they tend to release lots of debris overtime and are a bit weak. You can also use plaster of paris or other plasters, but they are often very bulky and hard to store. I used fiberglass sheets and fiberglass resin to make a lightweight, thin, yet durable shell. The downside, however, is that fiberglass is gross and smelly. Fiberglass cloth is ok to touch, but when cut, it makes a mess, and resin smells horrible and is bad for you, so working outdoors in a well-ventilated area is always a good idea. You WILL NEED GLOVES. I don't care how awesome you think you are, you WILL get resin on your hands and it will be unpleasant. Anyhow, the first step no matter what you use, is to take a knife and trim the excess silicone around the mold. Keep about an inch or so around the actual piece. Next, coat the silicone in petroleum jelly. The jelly can be found in any drugstore or a regular store like Walmart or Target. Simply grab a brush or use your hands to spread a very thin coat over the top. If you want to, you can also add a layer of WD40 just for good measure. Let it dry for a few minutes. If you're going to use plaster bandages, simply grab a bucket of water, cut them up, dip them in the water and apply them to the surface or your piece. If you're using plaster of paris, add some water to the powder, mix it up, and coat a large amount onto the surface. 
If you're going to be using the fiberglass, cut all the cloth into strips first. Once you get the resin onto your hands, you won't be able to stop and cut any more strips so you may as well just cut it all beforehand. Not only that, but resin has a very short working time so you won't have any time. It's easier to just grab the strips of fiberglass and throw them onto your mold and never touch them again. They're going to come apart and annoy you soon anyway. So once you've got them all cut up, mix your resin with the catalyst and grab another paintbrush. Lay a strip of fiberglass onto the cloth and dap it with a nice amount of resin to stick it onto the mold. Since you added the petroleum jelly, it will be a little difficult, but just dab the paintbrush downward directly onto the cloth rather than stroking it sideways to keep it from moving very much. Simple as that, just keep adding the cloth until you have about 2 layers of it, then let it dry completely before removing it.

Step 4: Demolding
Finally, the most exciting part! Now it's time to detatch your mold from the table, take off your shell and remove the inside to look at your mold! First things first, remove your shell, this should be relatively easy since we added the jelly to lubricate the surface. Now, gently peel the silicone off the surface. Depending on what sort of piece you have, this may also peel the silicone off the original piece. If not, just get ready to flip it over and fight it off. Now you're probably regretting the fact you put all the jelly on the surface, at least I did. The silicone was really gross to touch because it was so slimy, so maybe put some gloves on for this part. If you're like me and you used a clay sculpt, you will probably end up flipping the mold over and tearing it out. Don't be too forceful, but if you need to, you can stretch the silicone to help remove any complex pieces. Once the majority of the clay is out, you will probably see a destroyed original. Unfortunately, this is inevitable unless you completely massacred the original piece with all sorts of lubricants. Either way, there will probably be some residue inside the mold as well. This is a great advantage to using water based clay, all you have to do is dunk your silicone piece into some warm water for a few minutes to dissolve the clay and rub any remaining chunks off with your finger. If you're like me and you used oil based clay, you can also put it in warm water, but this will only loosen the clay. You will probably need to scrub it off using a soft scrub or a toothbrush as rubbing it with your finger will only spread it around in a thin layer. Once you remove all the clay, you may notice some rough edges or extra silicone in your mold in very thin feathery layers. These are little layers of silicone that manage to get under raised surfaces. Simply grab some scissors and gently trim any excess or unwanted silicone to clean up your mold.

AND THERE YOU HAVE IT!
A lovely one part mold that you can use to make many copies of that lovely sculpture you had to sacrifice!


For more information on purchasing jewelery and other props in my tutorials, requesting a custom item, or an idea for a new tutorial, feel free to email me at Kanti-Kane@hotmail.com (: 


Tuesday, March 27, 2012

Not dead, just having issues.

Hey guys just a quick shout out to show I'm still working on tutorials, I've just hit a bit of a snag with my work so I've got about 4 almost finished tutorials with a couple that are still in need of severe editing due to a sudden change of methods. On top of that, I've lost my camera, yay. Anyway, here's a list of the things that should be coming out soon:

Almost ready to post
- Full-body dragon suit with built in wings
- Hooved shoes (needs a lot of editing)
- Deadmau5 helmet
- Making and painting sculpey horns
- Basic one-part molds
- Complex molds


Currently in the works
- Realistic mermaid tails
- Basic spandex mermaid tails
- Simple resin masks
- Complex resin masks


Thanks for all of your patience, support and for taking the time to read!

Thursday, October 13, 2011

Daft Punk Helmet Tutorial

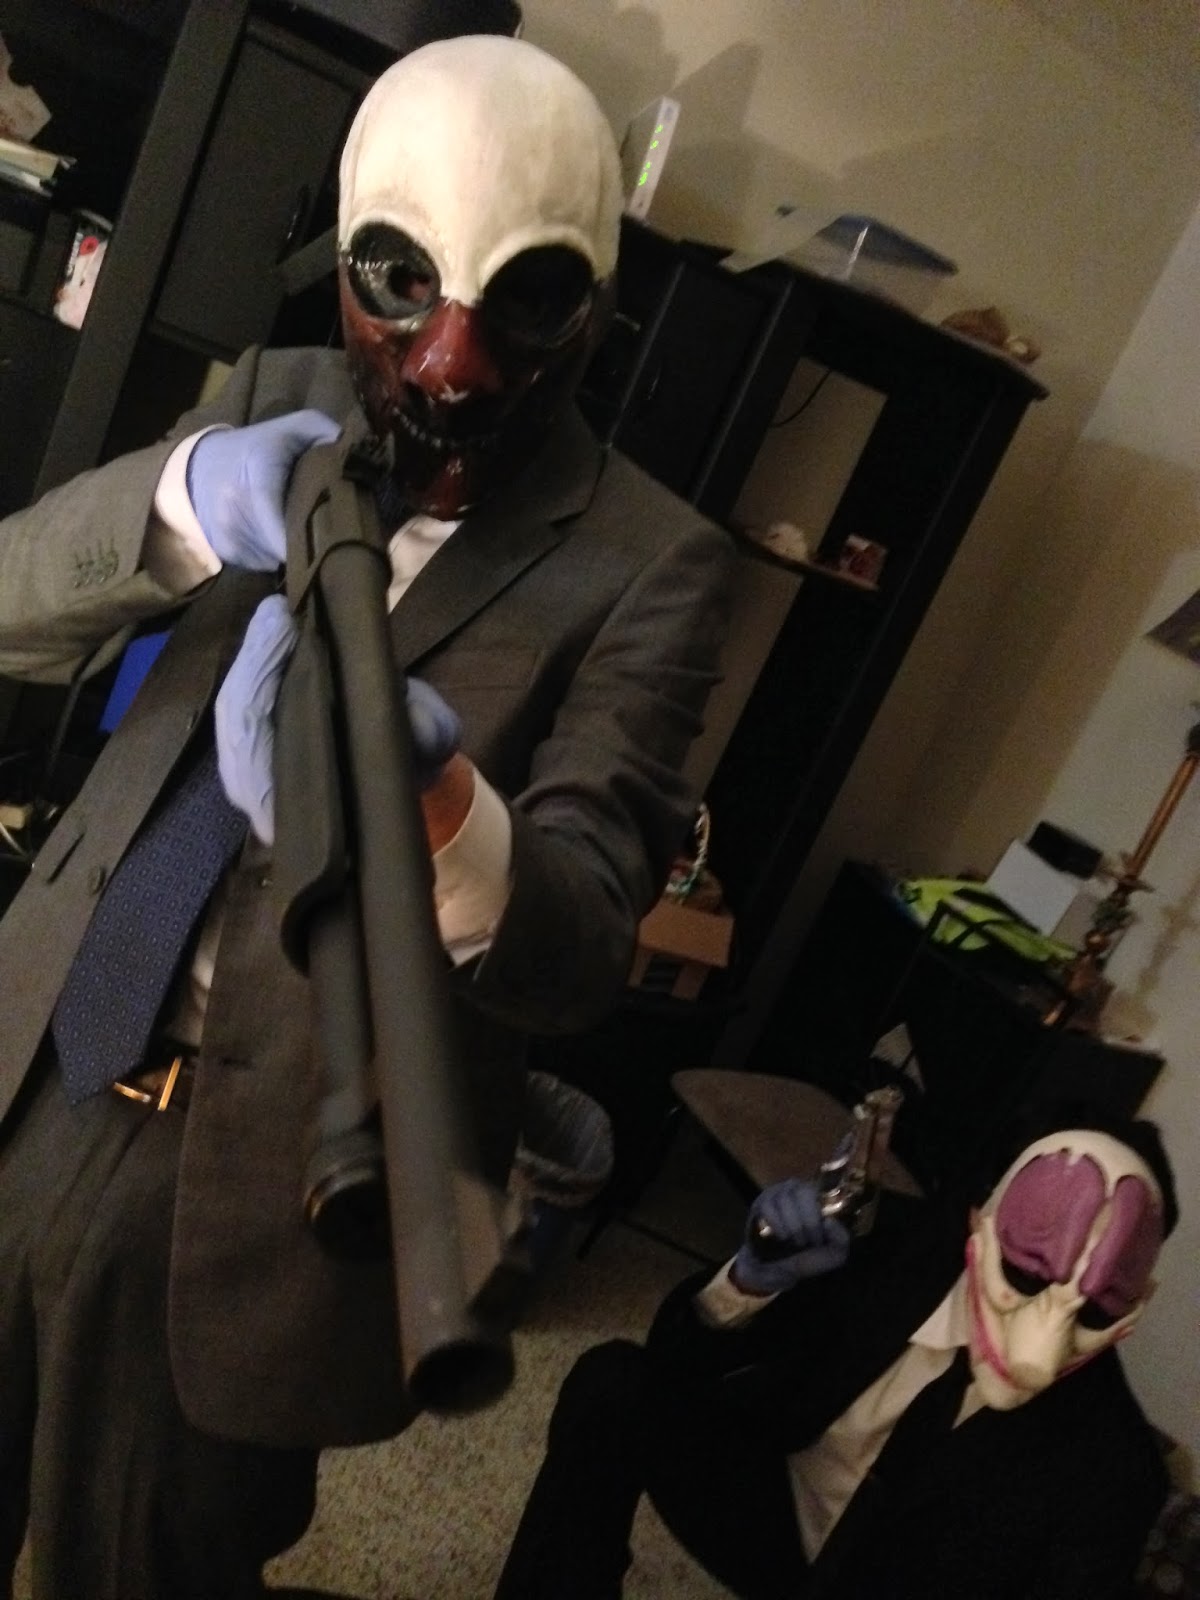
Want to make some cool armor but not so sure how to tackle it? Do you want to make a custom helmet but you don't have any idea what to do? Well I'm going to show you how to make a lightweight, durable, and relatively cheap way to make a helmet! In this tutorial, I'm going to show you how!

Materials:

- Cardstock paper
- Pepakura designer
- Fiberglass cloth
- Fiberglass resin
- Vacuum former
- PETG sheet/plexiglass
- Plastic cutter
- Ruler
- Clamp
- Exacto knife
- Quick dry glue
- Bondo car filler
- Spot putty
- Sandpaper

Total Cost Estimate: Around $100
(based off what I had to buy)
Currently selling for: All of your dollars

Project Duration Estimate: Several weeks

Overview:
A detailed explanation on how to turn a pepakura file into a durable, lightweight helmet, possibly even a master mold for copies. This tutorial includes lots of power tools and potentially dangerous materials, so please get an adult to help you out.

WARNINGS:
Exacto knives are VERY sharp. Be extremely careful when handling it! Always pay close attention to what you’re doing.
Fiberglass resin is a very toxic and dangerous substance. ALWAYS wear a respirator, goggles, and work in a well ventilated area.
BONDO: Car filler, can be dangerous. It releases very strong fumes and should not be handled without gloves.
This tutorial also calls for multiple power tools and manual tools that may be potentially hazardous if misused. PLEASE get an adult's help when it comes to using things you're unfamiliar with. Don't feel bad, either- I ask my dad for help all the time.


Always make sure you read through the entire process before beginning to avoid mistakes and get a general idea of how the project will progress.
Now let's make get started:


Step 1: Choosing your model
The very first step of starting this project is deciding what type of helmet/armor you’d like to make and finding the appropriate pepakura, adobe reader, photoshop, or whatever type of file for it that you like. Obviously. Well, you’d be surprised. I would strongly recommend using pepakura models, but often it’s hard to find those randomly around the internet and you need to search for a while. The reason I suggest it is because pepakura is DESIGNED for papercrafts, positioning pieces, rescaling the models and arranging the printing orders is very easy in the program. I really have NO idea how to rescale a photoshop or .pdf file, but I know that when you do so, I believe it increases or decreases the size in a ratio (1/3 the size, 2/9 the size) rather than being able to input the height, width, and depth of the model like you can in pepakura. Either way, I would RECOMMEND pepakura. Anyhow, once you decide the item you’d like to make, you need to search the internetz for a file that looks close enough to what you'd like. For halo helmets and daft punk helmets, there are a surprising amount of variations of the SAME style of helmet, so you need to pay close attention to which features you’d like, what looks easier to build, or whatever it is you’re looking for in specific. When you open a pepakura file, you get to see the pieces of the papercraft laid out in front of you along with the model itself with all the pieces arranged. This is great because you can see exactly how complicated and detailed the helmet will be, as well as how difficult and annoying it will be to create it.


Step 2: Scaling the model
I’ve already made a fully detailed tutorial on this step (found HERE), but I’ll talk about it for just a second here as well. When scaling the model, you have to take a few things into account. Are you the only one who’s going to be wearing this helmet? Does it need to fit multiple people? How snug do you want it? Are you going to install LEDs, cooling fans, or any other electronic systems inside the helmet? When considering all these, you can decide on how exact you’d like it to be in according to your calculations that you will be making. Of course, the downside is that in order to scale the model, you need to purchase Pepakura Designer. The free version – Pepakura Viewer, doesn’t have the option to scale models or rearrange the pieces, so if you don’t feel like buying it, you’re going to have to hope that your model’s scale isn’t too large or small. Remember, I am offering to scale models for anyone who needs it and print them on cardstock for you, just shoot me an email for more information.
Sometimes you can get away with not scaling down a model, but often the more detailed ones are purposely made extremely large in order to capture the details well.


Step 3: Cutting and making the model
Once you’ve gotten the model all nice and scaled down, you’re going to have to print it out , cut it, and form the actual craft. You MUST print the model on CARDSTOCK!! Cardstock paper is a thick, durable paper that greeting cards are made of. It can be found readily at any office store for a decent price, arts and crafts stores for much more money, and can be found very cheap at Walmart! Cardstock paper is important to have because it’ll make the model stiff and will be able to hold onto the resin without melting or collapsing like normal paper would. Making the model is probably the most annoying part, especially if you’re doing a detailed helmet. That’s why you need to make sure your pepakura model is favorable. For example, if you have 6 months to make the helmet, a 19 page pepakura model with 40 pieces may not be so bad, but if you have a week and a half to finish, you might need to stick with the 10 page model with 16 pieces.
Anyway, when it comes to cutting the model, you’ll notice many of the pieces have small triangles, squares, or other shapes sticking out from the main piece to aid in putting them together. This usually causes the models to be VERY hard to cut out with scissors. I STRONGLY recommend using an exacto knife. The exacto knife is very accurate, can cut corners sharply, and will allow you to cut the pieces out while they're flat on a table or floor- this will prevent you from bending or messing with your pieces before you’re ready to put them together. If you do go with an exacto knife, you’re probably going to want to buy a few extra blades- the sharper your blades, the easier things are to cut, so you’re going to want to switch out blades, especially if you’ve got a bunch of pieces.
For actually piecing the model together, you’re going to need to use glue. I recommend glue because it binds the pieces VERY well in comparison to tape. Tape is a HUUGE no. It will come apart and annoy the crap out of you while you’re working on another piece or if you tug on the model too hard. It also makes the finished model very flimsy and bendy (trust me, I wasted hours making a model with tape, it was horrible). Glue is the way to go. It gives time to adjust and move the pieces while it dries and once it dries, the glue soaks deeply into the paper and holds tightly and usually won’t come apart. Just make sure you choose a quick drying glue that’s flexible- you don’t want to be sitting there for minutes waiting for ONE thing to dry. I used a glue called “Quick Hold” that I found at Walmart. It’s a super-glue grade glue that dries pretty damn fast while not being totally annoying or extremely strong while it’s wet, so you have lots of time to put things into place. Besides the glue, exacto, and cardstock, you’re pretty much on your own. Just keep the pepakura model open on a computer in front of you so that you can keep track of where you’re going and try to start from one side of the model and completely work your way to the other. For example, if you start from the top, work to the bottom- if you start from the front, work to the back. This isn’t 100% accurate for all models, but it helps prevent you from bending pieces or stressing the model.

*OPTIONAL STEP*
Step 3b/5b: Reinforcing your Model

Now this step isn't completely necessary, but I'd highly recommend it. It really helps your model keep a definite shape throughout the entire process of layering and SHOULD be taken before adding bondo. If you're going to be putting fiberglass resin and cloth on the OUTSIDE of your helmet, then it may be best to do this directly after step 3. If you're going to be adding the fiberglass resin and cloth on the INSIDE of the helmet, then you may want to do this directly after step 5 (hence the 3b and 5b).
Either way, all this step includes is adding a few pieces of wood inside your papercraft to keep it stable and in place throughout the entire process of layering bondo and resin. Sometimes resin can warp the model and make it irregular and bondo will weigh the helmet down in different directions which leads to complications later on in the symmetry as well as simply keeping the helmet looking nice. So all we're going to need extra for this step are some thin wooden sticks, paint mixing sticks are a nice option, but since they're wide they might get in the way. Thin, wooden frames can be used for this step, if not, just grab some thin wooden sheets and cut them into strips yourself. The shape and design of your helmet is going to be the determining factor of how you go about this, so it's hard for me to tell you exactly. But you're going to want 2 basic supports, a horizontal and a vertical. The horizontal should run across the inside of the widest part of the helmet and the vertical support should go from the top of the helmet to the base, even past it a bit, to keep the helmet from sinking into itself. Arguably, you only need the horizontal support, but if you're scared you can always add the vertical one just in case. More supports should/can be added to places of weakness (example, the tip/chin of Guy Manuel's helmet or the visor of Thomas Bangalter's helmet). Simply mark the pieces, cut them, and place them inside the models using painter's tape. Don't glue them in or anything, since we're going to want to remove them later on.


Step 4: Coating in Resin
Once your model is nice and put together, it's time to ruin the hell out of it. Nah, it should be fine (in theory). From now on, the steps are going to get more and more tedious, but they will strongly effect how durable your helmet will be. The first step is to coat the model in fiberglass resin. The first thing you're going to want to do is gather all your materials in one place so that once you start, you don't have to run around or get anything. Once the catalyst is added to the resin, it will begin to dry, so you won't have time to do much besides put it on the model. So get your measuring cups, paintbrushes (around 3 or 4 is what I used), mixing sticks, plastic/latex gloves, respirator, apron, goggles, and resin all in one spot. You should also work outside, if possible. If you're going to work in a garage like I did, make sure the door is open and that you have some sort of fan on to shoot all the nasty resin fumes outside. Anyhow, the first coat of resin is the most important. It has to be thick enough so that it will make the helmet hard yet thin enough that it doesn't weigh your model down or make it sag or collapse. Coat the INSIDE of the helmets with the resin in a thin layer using a paintbrush. You should probably use the cheap-O ones at home depot because you're probably going to be tossing it out after. Cleaning resin off paintbrushes is pretty much impossible. Anyway, the first inner coat should be simple enough. Let it dry for about 4-6 hours before adding the next coat. You can coat the outside of the helmet just for good measure, but you should be more concerned with the inside.


Step 5: Adding Fiberglass Cloth
Now this step can be a bit tricky, but it shouldn't take you too long, either. However, it WILL drive you mad. Haha, maybe not, let's hope not. We're basically going to take our fiberglass cloth and put it on our helmet to reinforce it. I added my fiberglass to the outside of the helmet, but I recently found out that adding it to the inside of the helmet is much more favorable AND a lot easier! Either way, it's something that you may decide on personally, but I would recommend the inside. So one thing you've hopefully learned about working with the fiberglass resin is that you're going to want to get everything 100% ready before you mix your resin with the hardener. So the very first step is to cut your fiberglass cloth into small pieces.


Now, before we get into it, I'd like to point out a couple different options. There are 2 different types of fiberglass: there's fiberglass MATTING and fiberglass CLOTH. Fiberglass matting is very random looking. It kind of looks like someone piled a bunch of thin strings together and made them into a matt. It's usually a lot stronger, doesn't come apart as much as cloth, but it's also a lot less flexible. Fiberglass cloth, on the other hand, is very organized looking. It has a definite weave pattern, is much thinner and more flexible, yet comes apart very easily. Fiberglass cloth is probably the best choice for getting into all the cracks of the helmet and it's probably more readily available than fiberglass matting is. With whichever you choose, the following steps are the same, I just wanted to note some differences.


ANYWAY, back to our actual thing. So you're going to cut your fiberglass cloth into thin strips, preferably medium length, of about 4-6 inches. Be extremely careful with the cloth as you cut it, because fiberglass loves to come apart and make a huge mess. Use very sharp scissors and try not to tug or pull on the strips or it will come apart and get EVERYWHERE. We're going to be essentially using these as "paper mache" to reinforce the inside of the helmet. When you cut your pieces, try to leave them inside the helmet so you have an idea of when you have enough strips to fully cover the inside. However, don't use this as an excuse to stop cutting more strips.. ALWAYS CUT MORE THAN WHAT YOU THINK YOU'RE GOING TO USE. It's better to have all the strips pre-cut so you don't have to deal with more resin. Not only that, but you may need to go back and reinforce some areas that aren't covered as well. It's just generally a good idea to just have everything prepared and ready to go before you start so you're not wasting gloves, paintbrushes, or other materials in between layering times.


Anyhow, once you've got all your fiberglass cut, put some gloves on, mix up your resin, and apply a thin coat on the inside of the helmet. This coat doesn't need to be thick at all, it's simply to help you set the pieces into place. So, begin sticking your strips inside the helmet. When you have about 3 or 4 set in place, grab a nice brush-full of resin and dab it on top of the fiberglass strips. DO NOT STROKE THEM as you would if you were painting- for it will make them slide around, simply dab the resin into the strips from straight above until they're completely soaked. You'll notice that as you soak them, they will change color and almost 'disappear'. Simply pat them down until they're flat and soaked, then move on and add more strips, repeating the process until the entire helmet is lined. You may or may not want to add multiple layers of fiberglass. It's really up to you, but usually one layer is plenty. Once you're satisfied, set the helmet aside and allow it to completely dry! This usually takes significantly longer since there is a lot more resin, so allow around double the time.


OPTIONAL STEP 5b: Sanding the Fiberglass
Since there are multiple ways to make the helmet there are multiple ways to go about doing this. In this case, if you added your fiberglass cloth to the INSIDE of your model, you don't have to really worry about sanding anything down. On the other hand, if you've added it to the OUTSIDE of your model (as shown in the pictures) you should probably do your best to sand it down and trim any excess fiberglass handing off the edges. For this step, I had to use a power sander. Fiberglass and fiberglass resin are a bit more obnoxious to sand down than bondo, so I would recommend getting your hands on an electric sander if possible. At this point, I just don't think the sandpaper will cut it. Home Depot sells a very nice detail sander for only about $30 (can be seen HERE). It has good reviews and it's the one I ended up buying and I don't regret it so far. Anyway, this part doesn't have to be perfect anyway, you're just using the sander to get rid of all the uneven edges left behind by the cloth from stacking and simply hanging off the edge. Usually you can trim off some of the dangling pieces with scissors, especially if they're not coated with resin. That's another thing, if you missed a few spots and there are still dry patches of fiberglass cloth, DO NOT SAND. Go over them again with the resin. EVERYTHING SHOULD BE SOAKED: if not, when you go over it with the sander, the sander will simply unravel the threads and cause a big poofball.


Step 6: Adding Bondo
Now for some more caking on. This step we're going to be adding bondo car filler to the model. The bondo is a nice thing to have because it adds volume and weight to your helmet while allowing you to sand it down and make it smooth. The trick to adding the bondo is to make it as smooth as possible to eliminate the chances of bubbles being trapped in between layers. This will reduce your sanding time as well as your chances of needing a lot of spot putty.
If you've never worked with bondo before, it's basically similar to resin in the sense that you have your main product and a hardener. However, bondo dries VERY quickly and has the consistency of thick cake icing, so it's a bit more annoying to work with. The trick is to work in very small samples of bondo rather than mixing the entire amount all at once like you'd do with resin. Only use a small blop of bondo (a blop thats 3inches in diameter) and just a little bit of hardener (make a thin line across the length of the bondo). There are instructions on the actual case, as well, but the 3inch diameter blops work very well.
Spreading the bondo can be a pain if you use the wrong type of stuff and unlike resin, it can't be applied with a paintbrush. If you take a trip to Home Depot or Lowes to get some bondo, you'll notice near the aisle you find it in (painting section), there should be smoothing materials. Bondo sells a specific package of spreading thingies used especially for car filler. They're pink, bendy smoother thingies and they work great. I especially love that they're so flexible, unlike the normal stiff white plastic ones you get for $1. This allows a bit more maneuverability around corners or curved surfaces, but most importantly, it lets you flake off that stupid excess bondo that loves to cling onto the spreaders. They're about $4 but I think they're worth it, the only problem is they don't have small ones. If you don't feel like dishing out $4, that's fine too. Cardboard works surprisingly well when it comes to spreading bondo, the only problem is you'll need to replace it very often so cut a few extra squares of it before you begin, but it's basically free, so you can't lose. Whatever method you use, just make sure you spread your bondo as nicely and evenly as possible. Since you should be adding relatively thin layers, you only really need to put 2 or 3 layers onto the helmet in total. The more layers you put, the more imperfections you'll be able to hide from the pepakura, and the less blocky it'll look when you're done.


Step 7: Wet Sanding
Hopefully you took my advice and added thin, smooth layers of bondo onto your model. If you didn't, sanding is going to be a bitch. You're going to want at least 3 or 4 different grades of sandpaper for this. 60 is nice for starting off and weathering away most of the extra gunk, and 1000 is great for ending and getting the smoothest finish possible. So let's go with 60, 200, 400, 1000. You don't have to be exact like me, just make sure you have a nice range of sandpaper types so sanding will be as smooth as possible. Unfortunately, sanding will always take time, so just be patient. If you have a sponge to attach your sandpaper to, great, if not, just fold it up and sand by hand, it's similar enough that you won't notice.
So anyway, to the actual sanding, you can start off your 60 directly to the model just to get a general "smooth". I put smooth in quotations because you're not going to get it very smooth, but just try to get rid of the major cracks and bumps. Try to chip away most of the excess bondo that you don't need and try to start re-defining any features that you may have over-coated with bondo. Once you're done, it's time to add some water. Take a bucket, fill it with water, and dump a random sponge and all your sandpaper in there. Soak up your sponge and empty it all over your bondo'ed model a couple times until everything is nice and wet. Don't worry about the actual model getting any water damage, either. The resin coats absorbed by the paper make it waterproof. Begin wet sanding with the 60 grade sandpaper again. Don't press very hard and keep a general view on your model so you don't over-sand one area. Even though the 60 is very coarse, it won't strip all the bondo off your model. Once you see the sanding is getting close, switch to your next sandpaper grade. In this case, the 200. Use the next grade up to get closer to the actual shape, in fact, pretend your next sandpaper is your last one and try to get all of your details as nicely done as possible. Only move sandpapers when you're happy with how the helmet looks. The 60 grade should have make the entire helmet smooth and the 200 should be to touch up everything. Everything after is simply to make it COMPLETELY SMOOTH. Since the sandpapers are so fine, they won't make any large or noticeable changes, instead, they'll make the helmet even smoother, so every grade after your first 2 should be simply to make the helmet that much smoother. It's pretty self-explanatory, just make sure to keep your model wet the entire time.

Step 8: Adding Primer and Spot Putty
The first thing you want to do after you've sanded your model down is to add a nice coat of primer on there. The primer helps seal up the bondo and make it less likely to release any more debris (also it looks nice). You may notice the bubbles or spots that I was talking about when it comes to smoothing start to appear as you sand. They will appear in the form of small crevices or dips that come out when you start sanding. Don't worry about these, that's what spot putty is for. Spot putty is available in the same place as normal car bondo is and it works the same, it's just smoother and doesn't require a hardener. It comes in a little toothpaste tube and all you have to do is squirt a bit onto your spreader or piece of cardboard and then smooth it onto the ugly spots. Go around your helmet and locate all the little indents that you can find and circle them with a sharpie. This will keep you from forgetting about any spots. Next, add spot putty to all the ugly places that you'd like to fix up. Unfortunately, this requires more sanding, but it's well worth it. Not just normal sanding, either. Get your bucket and sponge back out and toss out the 60 grit sandpaper. Go around your helmet and start sanding all the spot putty areas again with the last 3 sandpapers until you're pleased with the smoothness once again, then slap on another coat of primer.

Step 9: Cutting out the Visor
Now it's time for the scary part, cutting out the visor. Arguably, you can do this step earlier on, but I prefer later so that you can get a more precise borderline that's easier to fix and define with bondo. Try to use a small dremel or cutter to get as precise as you can. There's not really much else I can tell you besides to be careful and take your time. Once it's cut out, it's all downhill from here. All you have to do is touch up any uneven spots or scratches you may have made from cutting and then it's off to vacuum form your visor!

Step 10: Vacuum Forming
Now this step can be extremely intimidating if you've never done it before, but it's really not as hard as it seems. Once you have the right info, anyway. All you really have to do is get the right supplies, measure everything accurately, and then be efficient in the actual process. Now, you might be saying, "wait, Kanti, I don't have a vacuum former, you never showed me how to make one", well, no, but for now I will give you 2 simple ways to make your own super awesome vacuum former for cheaps.
The first method (seen HERE) is a great and easy way to make one. It only takes about 20 minutes to fully assemble and works pretty nicely for almost anything you will probably be vacuum forming. What I don't like about this one, is that it's a big large, but besides that, it's great and lots of people use it.
The other method (seen HERE) is indeed a bit more complex, but it has a much stronger suction. This is useful for when it comes to getting those overhanging ledges (such as the visor in the Thomas helmet).
Either way, everything is going to be the same process, just a different frame. So, anyway, one thing I learned is you DON'T use acrylic sheets. The first thing you probably think is "yea, they're too thick". Well, they are, but that's not a problem. Simply heat them at a higher temperature. The problem with acrylic is that it's a pain in the arse to cut and it often bubbles after it dries, so steer clear from it. I know I featured a youtube video showing off the acrylic, but disregard it. Acrylic apparently sucks.
What you WANT instead are some PETG sheets. The can be readily found at your local plastic supply, some hardware stores, or online at amazon or eBay. I got mine from this store off eBay for a great price. Where-ever you decide to get them, just make sure they're CLEAR, so this involves reading the descriptions on the items, because often, they will have colored plastic coating (that you later peel off) on them so they won't appear to be clear. Anyway, once you got your PETG sheets (mine was 0.02 inches thick), you need to set them up in your frames to heat in the oven. Before placing them in the oven, you should probably grab a pair of gardening gloves (unused please) and coat every corner of it with foil incase your plastic decides to melt around and get in your oven. This will make your parents very happy and they'll think you're being considerate!
Anyway, the trick to heating the plastic is to watch for when it starts to tighten and then sagg a bit right afterwards. You'll notice the shine of the plastic will really be defined and it will almost start to look as if it's wet. Don't wait too long or let it sagg too much, at the first sign of an arch, turn your vacuum on, take the plastic out of the oven and place it over your visor. Let the vacuum do what it does best and let the plastic get sucked down onto the visor for a few seconds by itself. Then put your gardening gloves on and start smoothing the plastic down around any corners and eliminate any bubbles that may have formed while the plastic is still warm. For the Guy helmet, this step isn't completely necessary since it's generally smooth anyway, but if you're vacuum forming something more complex, you're going to want to pat and smooth it down.
Once the plastic has been sitting for a few minutes, remove it from the mold. You don't want to let it sit there too long or it'll cling to whatever it is you vacuum formed (in this case the bondo) and chip it off.

Step 11: Tinting and Installing your Visor
Finally, a pretty easy part. Well, sort of. I've never actually tinted a window before so it was actually very difficult. Either way, the first thing youre going to want to do is cut out your visor from all the excess plastic on your vacuum mold. So take out a dremel or scissors, if your plastic is thin enough, and start to cut from the main shape. Once it's out and ready, get a spray bottle or sponge, and dampen the inside surface of your visor. For the actual tinting material, I went to Walmart and got something called "Insta-Cling". It's basically a tinting film that can be removed if need be and the advantage to that is that you can take it off if you mess up, which I did several times. Anyway, once you've got the inside of the visor wet, you're going to want to cut out a decently sized piece of film and then CAREFULLY place one side on the end of the visor, then with a damp cloth, sponge, or anything soft, really, you're going to press down firmly and press the film slowly onto the visor. Do this very carefully and do it slowly passing over ONCE. That means, don't slide it all down then go back and fix it, instead, press down completely on one side before going forward, so you basically move in little steps so that when you get to the end, all you have is the other side. It's hard to explain, really, but just work from one side to the next, don't go back, or you'll get airbubbles, and when you get bubbles, it's very hard to get them out. Once the film is nice and set, cut off all the excess with some scissors. The major problem I had with this tinting material is that the ends almost always love to work their ways back up when you handle the visor. Usually you can just stick them back down, but if the water underneath dries they will stay up. Simply wet it again and place it back down. You can pass a heat gun over the tint LIGHTLY to secure it a little, but don't go too much or you might warp the vacumm formed plastic.