..

...

Sunday, May 29, 2011

Kanti has an Etsy


Just recently I created a shop on Etsy.
For those of you who may be wondering, etsy is a website for selling things online, but they have to fall into certain categories. The items you sell have to be home-made, vintage, or used for crafting. Something along those lines, don't quote me lol.

They charge a 3% transaction fee and also charge $.20 per item you list. The items stay up for 4 months so it's pretty nice. Better than the 9% ebay charges on their transaction fee. Ebay does, however, have a special price you can pay per month to open a shop and sell as much as you like, but I definitely don't have much to sell lol.

Either way, I would recommend it for anyone who wants to open up a shop and sell a few things they've made. But you should make an account either way for purchasing!
They have some pretty nice things on sale for very reasonable prices (:

Anyway, click here to view my shop!
I just want everyone to know that I will be selling MUCH more stuff in my shop in the future, so keep checking back~
I also am completely open to doing custom orders. Just shoot me up an email and let's talk about what you want (:

Tuesday, May 24, 2011

Lightweight Horn Tutorial


When making horns for a costume, sometimes they're limited in the size department because of weight complications. Making hollow horns isn't exactly my forte, but I have found something that's almost as good (:


Materials:

- Crayola Model Magic
- Elastic cord
- Acrylic paint
- Painter's tape
- Tin foil
- Long toothpick

Total Cost Estimate: $20
(based off what I had to buy)
Currently selling for: $20

Project Duration Estimate:
2 days

All of these materials can be purchased at your local arts and crafts store.

Overview:

This tutorial teaches how to make lightweight horns. These horns are a bit delicate, but they will not break if you're careful with them. They sit firmly on the head and have no major complications, but if they collide with an object hard enough, they will crack.

WARNINGS:
All the materials used in this tutorial are safe!

Always make sure you read through the entire process before beginning to avoid mistakes and to get a general idea of how the project will progress.
Now, let's get started:


Step 1: Shaping the foil
Cut out two large sheets of foil. The length of the sheet should be proportional to how much foil you want in each horn, in other words, how big you want them to be. This is not final, as you can simply add more foil later on, but you want your first guess to be as accurate as possible, since adding more foil is a pain. Make sure both sheets are equal before you begin. Once you get the sheets, take each one and shape it into a straight triangle shape. Make sure the horns have the same thickness in the same areas (if you want horns with a thick base, make sure the base of BOTH horns looks thick and that they're both pretty equal). Next, depending on your design, shape the horns into curves, bends, or other things you would like to add. Do the shape as best you can to both horns, but don't worry if they're not completely even. Just so long as you have the basic shapes, you'll be fine.
If you're going for a more complicated design that has a strong curl or something along those lines, don't do one horn completely and then start the other. Instead, work on them both at the same time, making minor adjustments to each one. This way, the horns will be more similar.


Step 2: Adding the model magic
Once your horns are in a shape you like, open your package of clay and immediately use a knife to cut it into 2 equal sections. This way, you will use the same amount of clay for both horns. Carefully begin covering the horn shape with clay. You don't want to press too hard or else the foil will poke through yet you don't want to press too lightly or the clay won't stick to the foil. A gentle press should do the trick. Make sure to get generous amounts of clay over every inch of the horn. The horns I made had just enough clay to cover them, so if you plan on making something larger, you may need another package. If this occurs, use all of the clay on one horn and buy another package later on. The model magic is air-dry and cannot be changed once it dries.


Step 3: Adding features
Once all your clay is packed onto the horn nice and even, you can begin shaping the horn. To do this, wet your finger, a knife, or a toothpick and use it to make the shapes and features you desire. Remember that you only have a thin layer to work with, so don't make your indentations too deep. For my horns, I managed to make a decently deep line that ran up the horn. If you start to hit foil and it shows a bit, don't worry, once you paint the horns it will disguise any foil that may have managed to poke through.


Step 4: Stringing the horns
Before you actually string your horns, we're going to prepare them. This step isn't necessarily stringing them, it's just poking a hole through so that you can later. For this step you're going to need a shish-ka-bob toothpick or other type of long, yet skinny object. Before you puncture the horns, draw a circle on a piece of paper that's roughly the size of the top of your head. Pretend this circle is your head from an above view. Label one side of the circle "front" and the opposite side "back" and then draw a straight line that crosses the circle exactly in the middle of these two points. These will indicate the front and back of your head. Place the horns on the circle in the angle that you would like them to sit on your head relative to the circle you drew and on top of the line that crosses the middle. Once you have positioned them how you would like them to look, puncture each horn with the toothpick using the line as your guide. It may take a couple tries, since the foil may interfere. Once you get it through, wiggle the stick a bit to open the hole a bit larger. This will be where you string your horns.
Once you're done and are satisfied with the holes, cover up any mistake holes you may have created and let the horns dry overnight. This clay does take a while to dry completely.

Step 5: Painting your horns

Painting the horns is self-explanatory. Just choose some colors and get at it. I personally prefer acrylic paints, but as far as I know, many types of paint can be used on this project. I would recommend the acrylics because they are fast drying, and this project requires several layers of paint. Since the horns are a bit delicate, the paint can be used as a type of "shell" to offer a bit more protection. It's not much, but it does help.

Step 6: Stringing the Horns
Once your horns are dryed up completely, you can feed the elastic cord through them. If you don't have elastic cord, you can tie a strand of string to the long toothpick you used to create the hole and feel it through. Use a hot-glue gun to seal the string in place.


And there you have it
A nice lightweight pair of horns! They may not be the strongest, but they'll do the job. And for a cheap price as well (:

If you're interested in seeing more about my Draenei costume, click here!

For more information on purchasing jewelery and other props in my tutorials, requesting a custom item, or an idea for a new tutorial, feel free to email me at Kanti-Kane@hotmail.com (:

Paper Mache Mask Tutorial


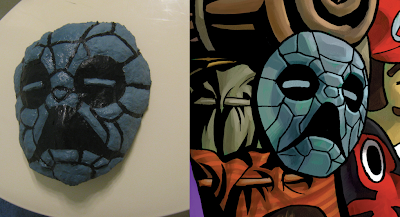
Masks are great additives to any costume. But in the Happy Mask Salesman's case, they're a necessity. With 10 masks on his pack, he's got a pretty distinct look, and with so many masks, having lightweight materials to work with is a wonderful plus. When making his costume, you can either purchase some mock masks to decorate his bag with, or you can make your own. It's a lot less hard than you think, I'm going to show you how.
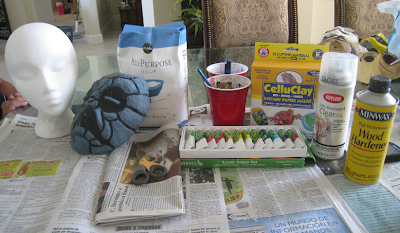


Materials:
- Wood Hardener
- Acrylic paints
- Sealant spray
- Foam head
- Celluclay
- Flour
- Elastic cord
- Water
- Salt
- Sharpie marker
- Scissors
- Newspaper
- Plastic wrap
- Large bucket
- Funnel

Total Cost Estimate: $50.00
(based on what I had to buy)
Currently selling for: $16.00 (5 or less) $13.00 (5 or more)

Project Duration Estimate: 4-5 days per mask

Many of these materials can be purchased at nearby arts and crafts stores, even Walmart. The foam head can be purchased at many beauty stores.

Overview:
This is a long process that requires several hours in between steps to allow the materials time to dry. It's also very messy. It produces lightweight, yet durable masks that do NOT have eyeholes. I will, however, mention how to make them in the tutorial. Since the materials come in large quantities, I would recommend making more than one mask. Here, we will work with 2 kinds of paper mache: home-made newspaper strips and paper mache based clay. Make sure to read carefully and examine the pictures to make sure you know which one to use at which time.

WARNINGS:
Chemicals used in this tutorial may be harmful when not used correctly. Wood hardener is a very dangerous and flammable chemical. The fumes it gives off are harmful if inhaled. Always work in highly ventilated areas and wear gloves and eye protection when dealing with it while it is wet! If you're under 16, get an adult's help before you continue. Remember to ALWAYS read the warning labels on products you are unfamiliar with.


Always make sure you read through the entire process before beginning to avoid mistakes and get a general idea of how the project will progress.
Now let's make get started:


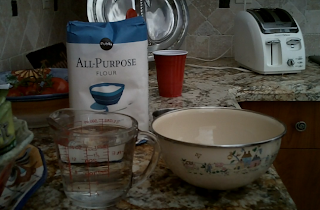
Step 1: Making the paper mache
As mentioned earlier, we will be working with 2 types of paper mache. This first kind is the newspaper strip kind. For this, we will use a basic paper mache recipe. Based on how many masks you are making, you will use certain amounts of flour and water.
For 5 Masks, I used the following recipe:
- 2 cups of flour
- 2 cups of water
- tablespoon of salt
I'm not sure why you add the tablespoon of salt.. I think it may have to do with altering the mache's drying properties. Either way, I added it just incase.
(Another thing is sometimes people use elmers glue in place of flour. I find this mixture to be a bit more unpleasant. It's a bit heavier, a LOT stickier, and it's impossible for me to use without tearing the newspaper strands. Personally, I prefer flour.)
If you don't plan on making 5 masks, you can alter the recipe to whatever you want. Just make sure you have equal parts of water and flour.
Use your scissors to cut out several long strips of paper from the newspaper. I used a paper-cutter. It saved a lot of time and made the paper strips better.


Step 2: Coating the Foam Head
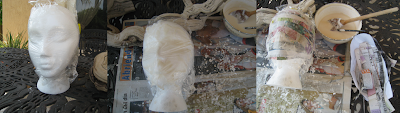
Your foam head is going to see a lot of action and it's not going to be pretty. A VERY necessary thing you will need to do is cover the face with clear plastic cling wrap. This way, the paper mache will not stick to the mannequin head and it can stay nice and clean. Take a long sheet of plastic wrap and wrap it tightly around the head. Make sure it's VERY secure. Try to unwrinkle the plastic so that you can get maximum coverage. Next, lay your head facing upwards so the paper mache can begin.
There are many ways to do this, but I find the cleanest way is to use a paintbrush to apply some four mixture straight onto the head and then laying down strips of newspaper over the "paste". This allows you to keep your hands clean.
Another way of doing it is to just get everything dirty. Dip your hands in the paste and keep them constantly wet. Then use them to smooth the newspaper onto the mask. You HAVE to keep your hands wet however. If they are only semi-wet, the mixture will start to dry and make tearing the newspaper more likely.
Once you have applied 2 or 3 layers of newspaper over the head, lay it out to dry. The drying process really depends on when you do it. I like to work during the day so I can lay things out to dry in the sun. Then again, I live in Florida so the sun is always harsh. For me, dry time only took a couple hours, for you it may be different.


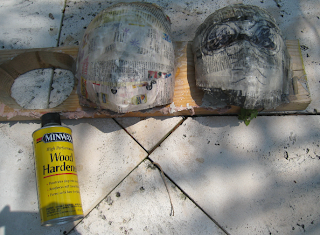
Step 3: Soaking in wood hardener
Once your paper mache mask is dried up, get ready to get it all nice and wet again lol. THIS IS THE MOST DANGEROUS STEP!!! Well, it's not so bad. But you do need to be careful and take necessary precautions. As mentioned in the warnings section, always work with chemicals with very strong smells and fumes in highly ventilated areas. Outside is ideal, especially since it can dry outside and you won't ruin any fancy furniture or carpet inside. This step is a bit tricky. Since we only want to soak the mask in the wood hardener, we will need the large bucket and funnel. Place your mask (or masks, this can be done with multiple ones) inside the large bucket. If multiple masks are being used, stack them on top of each other. Hold them inside the bucket. Pour the wood hardener over the masks and inside the crevices that are created from them being stacked together. Turn each one over and make sure the hardener has gotten every little section wet. Place them at the bottom of the bucket and pull each one out individually, gently shaking off any excess hardener into the bucket. Once this process is done with all the masks and there is nothing but hardener left in the bucket, place the funnel on top of the wood hardener's original bottle and pour the excess liquid from the bucket back inside the container. This way, you can reuse it again. Lay the masks out to dry yet again.


Step 4: A second coating of paper mache
Once the mask is nice and dry, use your scissors to clip off any extra dangling pieces of newspaper on the mask's edges. You'll notice that because of the wood hardener, the mask is now extremely tough and thick. This will help it hold it's shape and prevent from shattering when dropped. But most importantly, it will help us add MORE PAPER MACHE!!! That's right. Even more. But this step will give our mask a more realistic look. In this step we will add some more paper mache around the mask, and then we will curl the edges around the back of the mask. This gives the illusion that we have a thick mask rather than just a stack of paper. Usually after the wood hardener, the mask is strong enough to hold its shape through all the extra mache, but don't go overboard. No more than 2 extra coats is necessary. Once you're finished, lay the mask out to dry yet again.


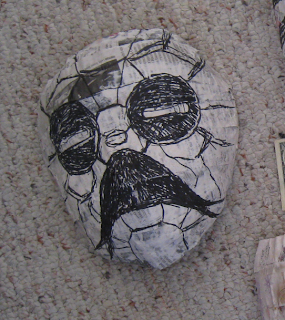
Step 5: Drawing on your design
Now that your mask is dry for the 50th time, it's time to draw the basic design onto the surface. With a pencil, draw out your design lightly, making sure that both sides of the face are proportional. Once you get a pretty good idea, trace over it with the sharpie. This step is to outline where you will be elevating the clay in order to create 3D structures in the masks. Unless you choose to skip the final claying step, you will not be seeing this sketch again, so don't get crazy and make it BEAUTIFUL and perfect. You're only using it to help you position clay. If you're doing the Happy Mask Salesman masks as I am, finding a good reference picture for his masks is very difficult. You may need to play the game and try to look at him for some masks. Overall, I was able to find a few decent pictures on deviantart and zeldawiki.

Optional Step: Adding the eyeholes
If you want to add eyeholes in your mask, now may be the best time. I didn't add any on my masks since they were being attached to a backpack and I wanted to make them as close to the game as I could. Sometimes eyeholes can be disguised into the mask if done clever enough. Since our mask is still mostly made of paper mache, we can still poke a decent hole and since you've just finished drawing your design on the mask, you have an idea of where the eyes should be. Depending on the mask's shape, you may or may not be able to poke the eyeholes into the anatomically correct areas. What this means, is sometimes the mask's nose or eyelids may be where your eyes will be. To find out where you should poke the holes, try your mask on. Chances are, the foam head's shape should have created a distinct imprint of where your nose and forehead should go in the mask. Since our mask still has newspaper everywhere, use it to your advantage. When putting the mask on, look directly in front of you and memorize the section of newspaper your eyes come close to contact with. Then, mark the area with a small dot with a sharpie. If you have one available, use a power drill with the smallest needle setting to drill holes into the mask where you have placed your dots. If you don't have a power drill, you could use an exacto knife or a nail and hammer, but just avoid scissors. You only want a very small hole so it's not too noticeable.


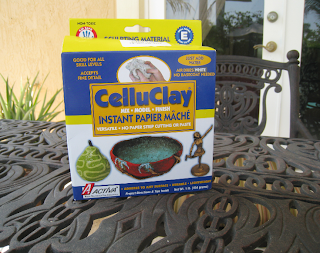
Step 6: Adding the Celluclay
Now finally, for the clay. Celluclay is a paper mache based clay so it has little pieces of paper mixed into the contents. In the box, it brings a pamphlet that says what ratio of water to add to the clay, but it was annoying to try and figure out so I just kept adding water until it was workable. Since the clay will dry in small quantities, it will usually need more water to be worked with either way, so adding more water isn't a big deal. Using the sketch as before, you're going to add clay to the mask. For my masks, I either added extra clay to the eyes or added none, to clearly mark them. Other features such as noses, lips, eyebrows, pupils, beaks, outlines, or anything that helps you determine where to paint should be elevated in some way. Another thing you will use the clay for is to give the mask texture. You should cover the entire mask with clay to hide any imperfections in the newspaper. Just remember not to cover the eyeholes if you made them! You can cover the relative area with clay and then poke a toothpick through the hole to clear any clay that may have gotten in there. When your entire mask is covered, dip your hands in some water and smooth the celluclay out. It is pretty lumpy, so it may be a bit difficult, but the lumpiness isn't hindering in any way. Once painted, it looks fine. You may sand it down if it bothers you, it's just a bit time consuming. Once you're pleased with the features, lay it out to dry. THIS time though, it will take the longest. The clay usually takes about 4-5 hours to dry out, so I would leave it overnight just to be sure.


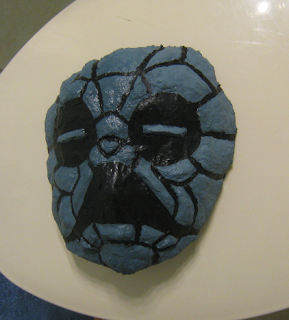
Step 7: Painting the mask
Now that your mask is basically at it's final stage, all that's left to do is paint it and seal it. Depending on the types of masks that you're making, you may be better off buying a kit of paint that comes with small amounts of different colored paints rather than a large tube for each individual size. Again, I like acrylic paints, so that's what I used. I would NOT recommend spray paint or watercolors. Watercolors are too light and won't cover well enough, and well.. Unless you have some sort of stencil, spraypaint will be useless. Paint your designs carefully on the mask, following the outlines you gave yourself in the clay, or simply by referring to your reference pictures. Don't fret if you mess up: just let it dry and paint right over it :')

Step 8: Sealing your mask
And with your mask painted it's time to seal it! Using your paint sealant, give the mask a quick coating. Make sure you do it outside, the stuff smells pretty strong and it can make your floors slippery and shiny. This step is not completely necessary, but I would recommend the heck out of it. This coat prevents any major chipping of the paint, including when you drop it or if it gets rained on. It also helps clean the masks easier if mud or soot gets onto them.

Step 9: Stringing your mask

And a quickie final step. Stringing the masks is very simple. Take your stretchy cord and cut a piece that fits just across the inside of the mask. Use hot glue to glue one side on at a time to the inside of the mask. I don't/didn't want to poke holes into my mask for the strings, so I just glued them on, but it's your preference.
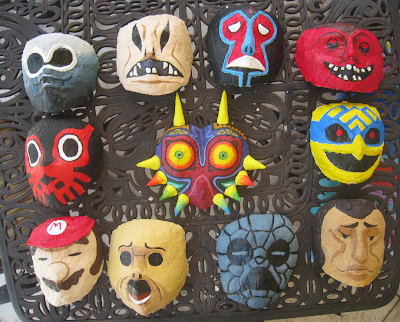


AND there you go~

A nice home-made lightweight mask that can withstand a beating (literally, I punched one in the face and it looked the same afterward lol)

For more information on this costume click here!

For more information on purchasing jewelery and other props in my tutorials, requesting a custom item, or an idea for a new tutorial, feel free to email me at Kanti-Kane@hotmail.com (:

Complex Jewelery Tutorial


When it comes to making a costume, jewelery can be a very tedious thing to deal with. With some characters, the jewelery may be simple and the exact or a similar piece can be bought at a nearby store. However, with some characters, the jewelery may be very complex and almost impossible to find locally or even online. This is especially true with Midna's adornments. The complex nature of their design makes them very unique and very difficult to replace with standard objects or common jewelery. BUT they can be easily crafted, and I'll show you how.

Materials:
- Super sculpey
- Acrylic paint
- Bag of plastic gems
- Reference picture
- Paper and pencil
- Knife and toothpick
- Chain-link necklace
- Needle tip pliers
- An oven

Total Cost Estimate: $25.00
(based on what I had to buy)
Currently selling for: $23.00

Project Duration Estimate: 4-5 hours

Many of these materials can be purchased at nearby arts and crafts stores, even Walmart.

Overview:
This project makes a durable, lightweight, and attractive looking headpiece/accessory. The super sculpey I used for it came in a large box that comes with a good amount of clay. If you are interested in making more pieces, you may want to purchase this box. If not, most craft stores sell air-dry sculpey that comes in very small $1 portions.

WARNINGS:
No harmful chemicals or materials will be used throughout this tutorial. Just remember to be careful when handling pliers. Metal can be uncooperative.

Always make sure you read through the entire process before beginning to avoid mistakes and to get a general idea of how the project will progress.
Now, let's get started:


Step 1: Finding a reference picture
Find a reference picture of your object online or in a magazine. Make sure the picture shows significant detail of the piece you want to construct, so you can make it as accurately as possible. Depending on the complexity of the piece, you may need multiple pictures from different angles. For our piece, we can get pretty decent results from using only one picture, but for larger objects, you may or may not need multiple pictures. Another thing, sometimes official art appears different from ingame pictures. So if two pictures contradict each other, you may need to either decide which one to use, or make a combination of the two.

Step 2: Sketching/printing a sculpting outline
Take your paper and pencil (or pen if you're feeling adventurous) and sketch out a life-sized model of the object as best you can. If you can find a silhouette of the object online, print it out! This may be rare, but if you can manage to find one, then you can skip drawing it. Just don't forget that you still need to make sure you print it out with the proper size ratio. Once drawn/printed, compare the picture to your forehead and see if it is appropriately sized. If it runs past your nose, it is too big.


Step 3: Distributing the clay
Take your super sculpey and form it into a very small ball. Depeding on the size of the prop you plan on making, you may need more or less clay, however, for the headpiece we are making, a very small amount of clay will be used. I usually separate the clay from the box so I don't have to mess with it too much and so I don't have to constantly tear new pieces of clay from the larger sections. From your ball of clay, use a knife to cut out equal smaller sections of clay to work with. For the next step, we will be making long, thin strands of clay, so it's nice to try and make the pieces similar. If this all sounds confusing, don't worry. You can skip it. It's just an overview to make sure your necklace comes out even and equal amounts of clay were used for each section.


Step 4: Creating the shape
Once you have the small (hopefully equal) pieces of clay to work with, begin rolling the clay into very thin snakey shapes. When I say thin, I mean thin. Remember, this piece has to fit on your forehead. If the strands are too thick, your piece will be too chunky and may possibly run past your nose. Once you've made the thin strands of clay, put them directly on the outline you made/printed. Make sure they fit nicely into the space you've given yourself to work with. Another small detail- DON'T FORGET to add a small "bridge" in the center of the piece to attach the gem to. It can't just float on nothing, after all.
This is the most tedious and difficult step and will take time, so don't rush yourself or it won't come out as nicely as it could! When you feel bored or bothered with working on the piece, take a break and come back to it later. Working on the same piece for a long time will make you want to hurry up and get it done sooner, which could lead to messy results.

Step 5: Small details
Use a knife, pen, toothpick, or other object you have laying around to aid you in the detailed work. For this particular headpiece, there are very thin lines running horizontally down the jewelery and small indentations in certain areas of the piece. The two bird-looking heads towards the top of the ornament need eyes and beaks, and there are small connecting loops that are used later for stringing. Use a toothpick for the very fine details, and a knife for smoothing it over and collecting any extra "debris" you may have kicked up with the toothpick. Remember to touch up the shape by adding sharp details. Once you are satisfied with how it looks, you can proceed to the next step. Just be completely sure you like what you see! Once you bake the object, you can't add anything else.
REMEMBER: to poke holes through the "chain connecting" areas, because we will actually be using them to string!


Step 6: Baking the clay
Once you're pleased with how your object looks, you're ready to bake it. On the box of super sculpey, there are instructions on how to bake the clay. They include what degree to bake it at and for how long, depending on the complexity and thickness. If you used a different kind of clay, you will have to adhere to the baking instructions on the box. Air-dry clay does not need to be baked and will dry overtime, same with paperclay. I wouldn't recommend these for jewelery, because they are often much more delicate.
Super sculpey bakes at 275º F (130º C) and this particular piece should only take about 15 minutes. Once it is done, remove it from the oven and let it sit for a good 10-15 minutes before handling. You can place it in the fridge to make it cool faster if you're in a hurry for some reason.


Step 7: Painting
For painting the piece, you have several options. Acrylic paints are my personal favorite because they dry quickly and have vibrant colors. Not only that, but they are waterproof once dry on clay (that's right, I tested it). You can use oil-based or water-based paints if you wish, but I prefer acrylic because it's cheap and comes in many colors. For this piece, I actually mixed some paint I had lying around, but you can purchase metallic silvery colors to get the same effect. The entire piece was coated in a very light silver and I added a touch of black to the silver to make a much darker tone for highlighting certain areas of the headpiece (the bird-eyes and indents).

Step 8: Attaching the gem
Now hopefully you created that "bridge" I was talking about before or attaching the gem will be a bit difficult. REMEMBER, you only attach the gem after you've baked the clay (so it won't melt in the oven) and painted the piece (so you don't get the gem dirty). Depending on the type of gem you purchased, attachment may require glue. Some gems that are meant to be attached to things have a sticky bottom and only need to have the paper peeled off before sticking, while others don't have this and need to be glued on. I used hot glue, to ensure that it won't fall off, but you can also use crazy glue. I would avoid elmer's glue, unless it's the industrial kind, because I don't think it's meant for clay.

Step 9: Stringing the piece
"Stringing" is a strange term. In this step, we will be adding the chain to the headpiece. For my chain, I used an old necklace I had lying around that was looking pretty ugly. I detached the charms from it and laid it on a table. Since we need to have the back parts in tact for attaching it to your head and sizing it properly, I instead attacked the front. Determine the middle of the chain and select a single chain link. Use the needle-tip pliers to deform the link and pry it open. Once open, you can separate the two sections of the necklace. Keep the chain link open and attached to the necklace. Repeat on the other side, grabbing the last link and prying it open in the same way. If done correctly, you should have a necklace that can still open and close in the back, but now on the front, it is detached and has an open chain link on either end. Sorry I don't have a picture, I forgot to take one, but I hope you can understand well enough. Anyway, once you have your links open, place the chain connecting loop of the clay piece in the center of the open chain link and use the pliers to clamp down on the link, forcing it to close around the clay loop. Chances are, the link does NOT close all the way, but that's fine. Just so long as you clamped the link closed tightly enough that it will dig itself into the loop, it will stay. Don't be afraid to use force either. The necklace should be pretty tough. Repeat to the other side.
If you didn't have a chain laying around, or just didn't want to use one, that is also fine. You may instead use a string (preferably silver or gray). Simply feed it through the loop and tie it around.
IF you forgot to make a hole through the loop to connect the chain to, don't sweat. You can simply hot-glue the chain/string to the headpiece.


And there you have it~
A very nice home-made costume accessory! Now that you've done this, you can tackle anything. And look, you have a WHOLE lot more clay to spare :')

For more information on purchasing jewelery and other props in my tutorials, requesting a custom item, or an idea for a new tutorial, feel free to email me at Kanti-Kane@hotmail.com (:

Mission Statement and Contact Information

Hello everyone. My name is Kanti and this is my tutorial blog. I hope to accomplish great things in this blog and I hope to reach a large number of people with my work. But the most important thing of all to me is that I hope to inspire you to go above and beyond what I teach you here. When I teach you how to do something, I hope you can come up with a way to do it better. When I show you how to make something, I want you to come back and show me how to make it better. I want my website to become a center of questions and answers, where people can come with any sort of project and I will be able to tell them the best way to do it. Where people can speak with me and tell me about other methods or products I can use to improve or revise my tutorials.
I want my blog to be more than a blog and I want myself to be more than just a teacher. I'd love to be everyone's friend and I'd love to be the person you go to when you have a project you just can't seem to start yourself on.

To reach me, try one or more of the following methods:

Hotmail and MSN Messenger: 
Kanti-Kane@hotmail.com
My primary mode of contact. I strive to answer my email 5 or more times a day. I'm free to discuss tutorial questions, tutorial suggestions, custom orders, or anything else.
I try to log into MSN but it may be a longshot to try and speak to me using that.

Facebook
Artist page: Search "Kanti Kane"
Like everyone else, I'm on facebook very often xD It's a great way to contact me but please don't use it for timely concerns because I delete the messages often. 

Etsy:
Kanti Kane
I check my etsy multiple times a day, so you may get a quicker reply from there depending on how busy I am. Here I try to discuss purchase information and custom orders.

Youtube
KantiKane
Youtube is a nice way to contact me since I find myself listening to music on there often. I try to answer concerns regarding my videos on youtube but I'm available to discuss anything here as well.

AIM:
Kanti.Kane@aim.com
I don't use AIM too often, but it's a great place to try if you'd like a more extensive or personal conversation with me with more immediate replies.

Deviantart
Kanti-Kane
I try to check my deviantart often, perhaps 3 times a day. I can be contacted through here though I don't recommend it since my inbox is filled with questions that I don't necessarially want to delete yet.